Our Favourite 5 Ways To Tie Your School Tie

Whether it’s in a traditional style or something a little funkier, a tie is the key component in making a school uniform look super smart. However, adapting to a new school uniform can be challenging, especially for students transitioning from primary to secondary school. Among the various components of the uniform, the tie often stands out as both a style statement and a source of stress for those unfamiliar with tying it. To ease this transition, we have compiled a comprehensive guide on the top five ways to tie a school tie, ensuring that students look sharp and feel confident. The first, a Four-In-Hand Knot, is the easiest and most typical for secondary school students.
-780x429.jpg)

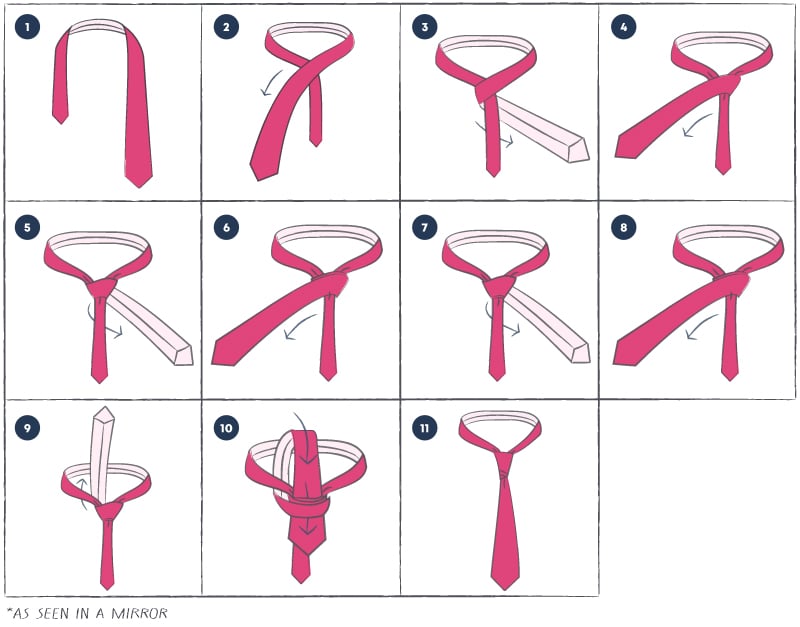
1. FOUR-IN-HAND KNOT
The Four-in-Hand knot, named after the 19th-century Gentlemen’s Club, is a timeless classic known for its simplicity and elegance. It's often referred to as the "schoolboy" knot due to its straightforwardness and reliability.
- Start with the wide end of the tie on the right and the small end of the left. Position the small end slightly above your belly button.
- Move the wide end over the small end to the left.
- Take it under the small end and to the right.
- Bring it across the front and to the left again.
- Pass it up into the neck loop from underneath.
- Finally, bring it down through the loop you've just created in the front.
- Tighten the knot by pulling down on the wide end and adjust it by sliding the knot up.
-780x429.jpg)

2. HALF-WINDSOR KNOT
The Half-Windsor Knot is an extremely versatile and simple knot that ensures you will look smart and ready for the day. It is larger than The Four-in-Hand Knot, yet smaller than The Windsor Knot – the perfect in between!
- Start with the wide end of the tie on the right and the small end on the left. The tip of the small end should rest slightly above your belly button.
- Move the wide end over the small end to the left.
- Take it under the small end and to the right.
- Raise it up to the center, towards neck loop.
- Then through the neck loop and to the left.
- Move it across the front, and over to the right.
- Raise it up into the neck loop from underneath.
- Then down through the loop you’ve just created on the front.
- Tighten the knot by pulling down on the wide end. Slide the knot up and adjust.
-780x429.jpg)

3. THE WINDSOR KNOT
The Windsor knot, inspired by the Duke of Windsor’s preference for a wide triangular knot, is perfect for formal occasions. It exudes confidence and sophistication. It’s much wider and thicker than The Four-in-Hand Knot.
- Start with the wide end of the tie on the right and small end of the left. The tip of the small end should rest slightly above your belly button.
- Move the wide end over the small end to the left.
- Then up into the neck loop underneath.
- Bring forward and down to the left.
- Pass it around the back of the small end to the right.
- Raise up to the center, towards neck loop.
- Feed through the neck loop and down to the right.
- Pass across the front to the left.
- Raise up into the neck loop from underneath.
- Then down through the loop you’ve just created in the front.
- Tighten the knot by pulling down on the wide end. Slide the knot up and adjust.
-780x429.jpg)

4. THE ELDREDGE KNOT
The Eldredge knot is an unorthodox, complex necktie knot that involves 15 individual steps. It was invented by Jeremy Eldredge in 2007 and became popular via internet fame in 2008. The knot is larger than a Windsor knot and creates a tapered fishtail braid-like effect.
- Start with the wide end of the tie on the left and the small end on the right. The tip of the wide end should rest at the top of your belt buckle.
- Move the small end over the wide end to the left.
- The under the wide end and to the right.
- Raise it up to the center, towards the neck loop.
- Through the neck loop and the left.
- Pass across the front, to the right. Then up into the neck loop from underneath.
- Move it down to the left and around the back of the wide end to the right. Keep this part loose.
- Bring it across the front towards the left and through the loop you've just created.
- Pull the small end towards the left to tighten.
- Then feed around the neck loop to the left from the top.
- Raise up to the center towards the neck loop, and feed behind to the right. Keep this part loose.
- Pass across the front towards the left and through the loop made in the previous step.
- Pull the small end towards the left to tighten.
- Tuck the rest of the small end behind neck loop on the left side.
- Strut your stuff.
-780x429.jpg)
5. THE VAN WIJK KNOT
The tall and cylindrical Van Wijk knot was invented by artist Lisa van Wijk in an attempt to create the tallest wearable knot. The Van Wijk knot is a variation of the Price Albert, with an added third turning at the active end.
- Start with the wide end of the tie on the right and the small end on the left. The tip of the small end should rest slightly above the belly button.
- Move the wide end over the small end to the left.
- Then pass under the small end to the right.
- Wrap across the front and to the left.
- And then under the small end and to the right.
- Pass across the front and to the left again.
- And under the small end and to the right.
- Wrap across the front and to the left.
- Then up into the neck loop from underneath.
- Finally feed it through all three loops in the front.
- Tighten the knot up and adjust.
- The first and second loop should show slightly underneath the third loop.